Top page & What's NEW! Download models Download Scenery
Create the new airplane Create the new scenery ParDesigner & GeoEX
SmartPropo


How to make scenery
.*>>> Link to the German manual
.
**Let's try to make scenery most easily**


NEW!
Click on this, and download [SceneryTutorialSetBeta7.zip]
SceneryTutorialSetBeta7.zip   292KB

Prepare some photographs to make scenery.
Aerial photographs are better for it. 

Paste the photograph as the following bmp files.
You can use only one photograph for all bmp files.
aaaaa1.bmp
aaaaa2.bmp
aaaaa3.bmp
aaaaa4.bmp
aaaaa2r.bmp

Yes, it is finish!   o(^-^)o Smile
Try to load it in FMS!

It is not difficult to make scenery for FMS. 
I am going to explain the detail now. 
 

.
**How to make your original scenery**


First, give a name to your scenery.
I explain this time with the name of Test.

Change aaaaa > Test

Test1.bmp
Test2.bmp
Test3.bmp
Test4.bmp
Test2r.bmp

TestHeight.bmp
TestSky.bmp
Test.scn


Open scn file by using the text editor.
Change aaaaa > Test
 
SKY 300 5000@@TestSky
//                  X    Y
AIRCRAFT_POSITION  -170 -175 0
PILOT_POSITION     -175 -180 0

3D_LANDSCAPE   TestHeight

SCENE 500 250 25

QUADRANT 0 0   1 1  Test3
QUADRANT 1 0   1 1  Test4
QUADRANT 2 0   1 1  Test3
QUADRANT 3 0   1 1  Test4

QUADRANT 0 1   1 1  Test1
QUADRANT 1 1   1 1  Test2r
QUADRANT 2 1   1 1  Test1
QUADRANT 3 1   1 1  Test2

QUADRANT 0 2   1 1  Test3
QUADRANT 1 2   1 1  Test4
QUADRANT 2 2   1 1  Test3
QUADRANT 3 2   1 1  Test4

QUADRANT 0 3   1 1  Test1
QUADRANT 1 3   1 1  Test2
QUADRANT 2 3   1 1  Test1
QUADRANT 3 3   1 1  Test2

DIM3
QUADS

END


Get some photographs that you like.
I think you can get aerial photographs on the Internet.
If you do that and upload it in your website,
I recommend you to get permission from the author. 
 

Make BMP map. 
1024*1024size or 512*512size

If your photographs are too small to get the required size,
you can connect the same photograph.

Make the seam invisible.(Seamless)
You may be able to look for useful software on the Internet.

I am using Photoshop Plug-in Filter 
http://www.geocities.com/murakuma/


Divide the completed photograph into four sheets. 

Name them like this, and save them. ( 256*256  256Colors)
Test1.bmp
Test2.bmp
Test3.bmp
Test4.bmp


Then, save the picture Test2r.bmp again as a ( 512*512 full-color) file.
Test2r.bmp

This is the part which runway is drawn in.
In other words, the area around the runway needs high resolution. 

Draw a runway in Test2r.bmp.
It is good idea that you draw a lake for seaplanes.

It is no matter where you locate the runway
You can locate it by using an scn_file after this work.

After you finished save it.
(If possible, make it 256 colors.)


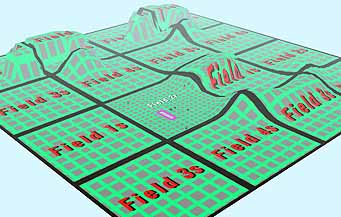
This is the location map of each bmp-file in FMS.

.
Test1
.
Test2 Test1 Test2
.
Test3
.
Test4 Test3 Test4
.
Test1
.
Runway
Test2r
Test1 Test2
.
Test3
.
Test4 Test3 Test4


***Height.bmp is an image for the topography.
You can arrange the shape of the scenery by this file.

White >  low land
Black  > mountain

I drew such an image for the explanation. 
It is a smiling face!

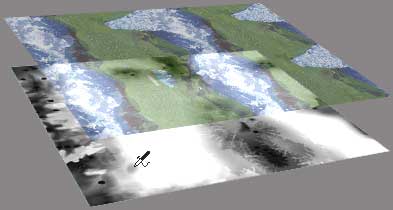
It is like this when you load it in FMS.
(Lattice-shaped ground was drawn)

Draw it shade off > Smooth slope
Draw it powerfully > Cliff 

You must draw a runway flatly.


It is convenient using paint software with the layer function.
Topography can be fitted to the photograph.

If you use paint software that has layer function, 
put a picture as an upper layer, 
and make it translucent, and draw.


 I use finger function frequently.


Open the scn file by using the text editor.
Adjust the position of the "PILOT and AIRCRAFT".
 

SKY 300 5000  TestSky
//              X    Y
AIRCRAFT_POSITION  -170 -175 0
PILOT_POSITION     -175 -180 0
...................
.............
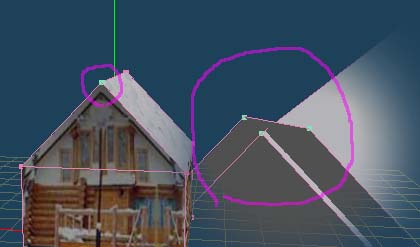
Load FMS, and adjust it.

Coordinate in FMS
.

.
***How to put objects in the scenery***


The objects made into the geo file can be put in the scene. 

Create an easy model by Metasequoia.

 
Attention!

You must not make triangle.
It becomes an error when it is described in the scn file with "TRIANGLES".
The quadrangle which is endlessly close to the triangle is all right.


Reduce polygons as much as possible.

The name of the BMP file for the texture of this model is TestShed.bmp.
( 256*256  256Colors)
Only 256*256 size can be used for the GEO data.

Convert it into the geo file by using GeoEXfrom the X file.


Open the geo file by using the text editor.
Copy the following from   // Rumpf1

//GeoEX Ver0.4 2001-07-20 Masuoka

OBJECT BODY
0
0 0 0
0 0 0
0 0
// Rumpf1
__________________________Copy the following from here

CULL ON

COLOR 1.00 1.00 1.00 0 0
TEXTURE ON
QUADS
-157 53 5.000000 5.000000 5.000000
-159 119 5.000000 5.000000 -0.023250
-19 122 -5.000000 5.000000 -0.023250
-17 56 -5.000000 5.000000 5.000000

-158 119 5.000000 -5.000000 -0.023250
-157 53 5.000000 -5.000000 5.000000
-17 54 -5.000000 -5.000000 5.000000
-18 120 -5.000000 -5.000000 -0.023250

-86 -4 -5.000000 0.000000 9.360450
-88 119 -5.000000 0.000000 -0.023250
-18 120 -5.000000 -5.000000 -0.023250
-17 54 -5.000000 -5.000000 5.000000

...................
.............
 

____________________________________________


// Tragflächen 1

// Tragflächen 2

// Höhenruder

// Seitenruder

END


Open scn file by using the text editor.
Paste data.

Change TEXTURE ON  >TEXTURE TestShed
( bmp file name of the model )

You must write down POSITION X Y Height before the model data.
 

SKY 300 5000 TestSky
//                   X    Y
AIRCRAFT_POSITION  -170 -175 0
PILOT_POSITION     -175 -180 0

3D_LANDSCAPE   TestHeight

SCENE 500 250 25

QUADRANT 0 0   1 1  Test3
QUADRANT 1 0   1 1  Test4
QUADRANT 2 0   1 1  Test3
QUADRANT 3 0   1 1  Test4

QUADRANT 0 1   1 1  Test1
QUADRANT 1 1   1 1  Test2r
QUADRANT 2 1   1 1  Test1
QUADRANT 3 1   1 1  Test2

QUADRANT 0 2   1 1  Test3
QUADRANT 1 2   1 1  Test4
QUADRANT 2 2   1 1  Test3
QUADRANT 3 2   1 1  Test4

QUADRANT 0 3   1 1  Test1
QUADRANT 1 3   1 1  Test2
QUADRANT 2 3   1 1  Test1
QUADRANT 3 3   1 1  Test2

DIM3
QUADS

         X     Y   Height
POSITION -150 -153  3

CULL ON

COLOR 1.00 1.00 1.00 0 0
TEXTURE TestShed
QUADS
-157 53 5.000000 5.000000 5.000000
-159 119 5.000000 5.000000 -0.023250
-19 122 -5.000000 5.000000 -0.023250
-17 56 -5.000000 5.000000 5.000000

-158 119 5.000000 -5.000000 -0.023250
-157 53 5.000000 -5.000000 5.000000
-17 54 -5.000000 -5.000000 5.000000
-18 120 -5.000000 -5.000000 -0.023250

-86 -4 -5.000000 0.000000 9.360450
-88 119 -5.000000 0.000000 -0.023250
-18 120 -5.000000 -5.000000 -0.023250
-17 54 -5.000000 -5.000000 5.000000

...................
.............


// Tragflächen 1

// Tragflächen 2

// Höhenruder

// Seitenruder

END


***The method which makes a part of texture map transparent***

Paint the [part of the transparency] by perfect black.

This bmp file was named TestTree.bmp.
( 256*256  256Colors)

Write TRANSPARENT behind the BMP file name.
Then, black part becomes transparent.

...................
.............
 

TEXTURE TestTree TRANSPARENT
POSITION -100 -100 2.4
256 256 -3 0 0
0 256 3 0 0
0 0 3 0 6
256 0 -3 0 6
256 0 -3 0 6
...................
.............
 

It load in FMS.

You can put your friends in FMS!


Draw shadow under the object.
It seems much more realistic.


FMSBeta7
The scenery of Beta7 is just a little different from Beta6.
The sky is included into a part of the scenery file with Beta7.

****sky.bmp  ( 256*256 FullColor Seamless )
     Write down the file name of the sky at the head of the scn file. 

Example
SKY 300 5000 ****sky

AIRCRAFT_POSITION  -170 -175 0
PILOT_POSITION     -175 -180 0

3D_LANDSCAPE HEIGHTDIST     <--This number disappeared
...................
.............
 

In beta 7 you can't pass through the objects in the scenery.
But you will be able to land planes on the roof of the buildings or crash the planes in fail.
I think you will be enjoying landing planes on different height platform that you create.
You may land on an aircraft carrier ship that you made.

.

***  Let's try !  ***
Don't give up even if you can't go well at first.
It is pleasant to fly planes in the scenery that you created.
You can make the scenery of the club's runway that you belong to.
If you use the photograph of your club members they will be glad very much to find themselves in FMS scenery.

Show it to me by all means if it is completed!    o(^-^)o

 ***Author Yosito Sekiai (Japan) ***
    xxxxxxxxxxxxxxxxxxxxxxxxxxxxxxxxxxxxxxxxxx
   Homepage. RC airplane Experimental atelier
    xxxxxxxxxxxxxxxxxxxxxxxxxxxxxxxxxxxxxxxxxx

..
NEW!
Link


FMS Landscape Design
(This is the homepage of Mr. Paul.)
 

.

<<<<Return